Technowatchpk.com | Hub of Tutorials, Software Reviews, Mobilephone News
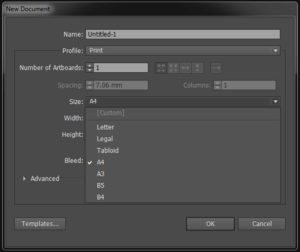
Welcome to Adobe Illustrator tutorials. In previous tutorial we discussed about the What is Graphics and types of Graphics In this tutorial we will talk about the creating a new document. When we crate new document by pressing Ctrl+N key from keyboard or creating it from main menu that is File>New – we will see following New Document dialog box
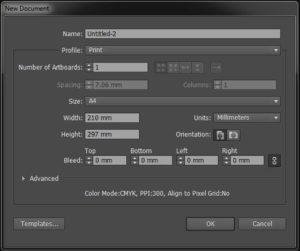
In above image first one is Name filed, what is file name. After that Profile is appearing. When we click on profile we will see a a list of items as shown in following image.
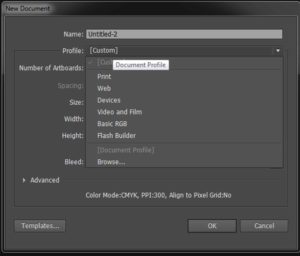
In the list the first item is Print. Adobe Illustrator is not only use for print work but also for Web, Devices, Video and Film, Flash Builder etc as shown in the dialogbox. Afterward there is Number of Artboards option. The Artboard is like a page. Here we can decide that how much Artboards we require to work. We can also add/delete later on while working inside the software. In the same line there are some options which only activate when we chose number of artboards more than one. These are Grid by row, Grid by column, Arrange by row, Arrange by column. We will discuss about them later After that there is size option. . After selecting type of document from Profile you will see many sizes related to that. For example for Print profile there are Letter, Legal, Tabloid, A4, A3, B5 & B4 as shown below.
There are some options related to size like Width, Height, Units, Orientation. If we talk about units, you can work in Points, Picas, Inches, Millimeters, Centimeters & Pixels as shown in following image.
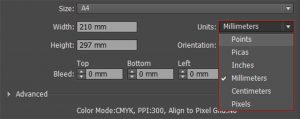
Orientation means how you want to work in your artboard, Portrait or Landscape. And one there is one option Bleed, We will discuss later about bleed. And the last option is Advanced which is collapsed. When you click on it, some details will appear as showing in following image.
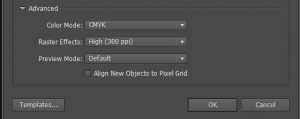
First of all there is Color mode. There are two color modes. CMYK (Cyan, Magenta, Yellow, Black) and RGB (Red, Green, Blue). The second entry is Raster Effects, For Print purpose we always work in CMYK mode with 300 ppi. And if we make design for display purpose only like web template than we work in RGB mode.
At bottom left there is a button namely Temlates. These are pre made templates by Adobe which we can use for type of work.
I will make video tutorial of each part of this Adobe Illustrator Tutorials series.
Our next tutorial of this series of Adobe Illustrator Tutorials will be Interface of the Adobe Illustrator.